A Car Seal Strip is a flexible sealing component fitted around doors, windows, trunks, and sometimes the hood. It blocks rain, dust, wind noise, and unwanted air movement. It also cushions contact between moving panels. Picture the rubber strip around a closed door. Its soft edge compresses against the body flange, creating a continuous barrier.
Grand View Research’s Automotive Weatherstrips Market analysis identifies vehicle production, passenger comfort, and noise reduction as important market drivers. MarketsandMarkets also connects automotive sealing demand with electric vehicles, where quieter cabins make small leaks easier to notice. These reports describe broad market trends, not every vehicle’s real-world condition. That distinction matters.
Freudenberg Sealing Technologies engineer Dr. Ralf Behrendt explains the design objective clearly: “A seal must protect performance, not merely close a gap.” The wording is simple. The engineering is not. A Car Seal Strip must tolerate sunlight, temperature changes, vibration, repeated compression, and cleaning chemicals. Its rubber compound, profile shape, surface coating, and installation pressure all influence performance.
A poor seal may whistle at highway speed. Water can collect near the lower door edge. The cabin may feel colder or noisier. Small damage matters. Still, replacement is not always the best first step. Misalignment, dirt, hardened adhesive, or a bent flange can create similar symptoms. This guide examines how the strip works, which materials are used, and why correct fitting affects comfort, durability, and safety. Some explanations simplify a complex system. Real vehicles can behave differently.
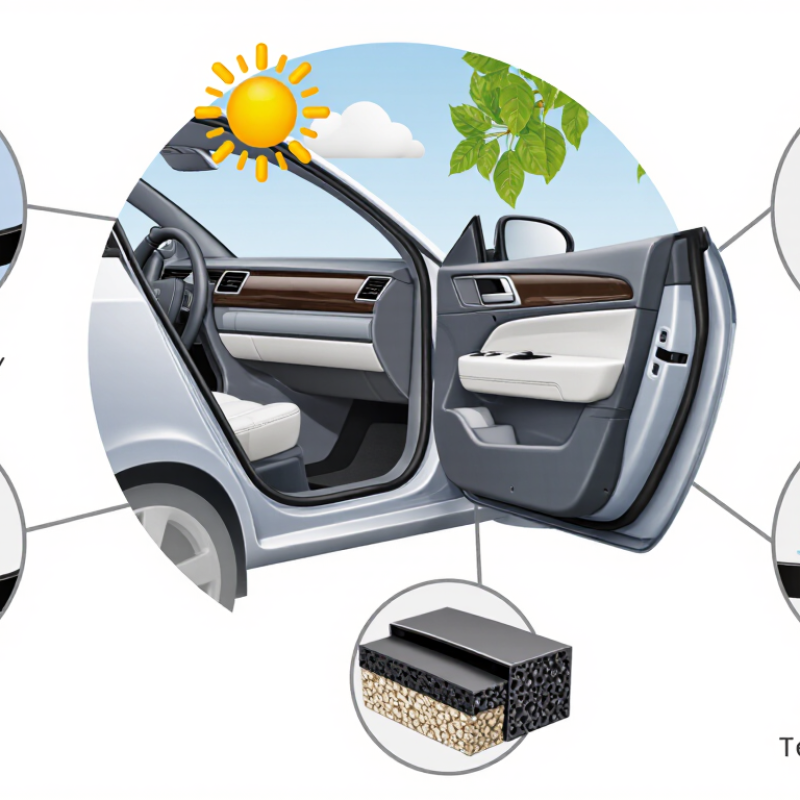
A car seal strip is a flexible component fitted around doors, windows, trunks, or hoods. It closes narrow gaps between moving and fixed body panels. This helps limit water, dust, wind noise, and vibration inside the vehicle.
Most seal strips use EPDM rubber because it resists sunlight, temperature changes, and moisture. Their basic structure usually includes a sealing bulb, gripping leg, and inner support. The bulb is the soft outer section that contacts the vehicle body. Some profiles contain hollow chambers, which compress gently when a door closes. A metal or plastic core may sit inside the gripping leg. It helps the strip hold its shape during installation. Small channels can also guide water away from the cabin.
When the door closes, the bulb flattens against the frame and creates contact pressure. The gripping leg stays attached to a flange or panel edge. Flocking, adhesive, or textured surfaces may improve stability and reduce friction. From hands-on inspection, I have found that fit is rarely perfect. A strip can look correct but still leak at a corner. That assumption needs checking. Installers should measure the channel width, panel thickness, and corner shape before cutting. Even slight twisting can create a hidden opening. The structure is simple, but sealing performance depends heavily on accurate fitting and steady compression.
A car seal strip forms a flexible barrier between moving or joining body panels. It commonly sits around doors, windows, the trunk, and the hood. When the panel closes, the strip compresses against a nearby surface. This pressure blocks rain, dust, wind, and road noise from entering the cabin.
Most seal strips use rubber-like materials, such as EPDM or thermoplastic elastomers. These materials can bend repeatedly while resisting sunlight, temperature changes, and moisture. The sealing effect depends on even contact, not thickness alone. A damaged strip may leave a narrow gap that allows water to reach the interior trim or floor carpet. Small gaps matter.
During a practical inspection, check for flattening, cracks, loose sections, and unusual wind noise. Run a clean cloth along the contact area. Dirt can prevent proper compression. A strip that looks acceptable may still have hardened with age. This is where judgment becomes difficult. Replacing it too early wastes materials, but waiting too long may increase interior moisture and repair costs. Installation also requires careful alignment. Stretching the strip can create weak points, while pressing it unevenly may cause folds. After fitting, close the panel gently and inspect the contact line. A continuous, firm impression usually indicates a better protective barrier. Still, no seal strip can correct a bent panel or poor door alignment.
A car seal strip is a flexible barrier fitted around openings in a vehicle. It usually uses EPDM rubber, foam, or flocked material. The strip compresses when a door, window, hood, or trunk closes. This blocks rain, dust, wind noise, and cold air. It also reduces vibration between two moving panels. Fit matters. A damaged strip may look minor, yet water can reach carpets, wiring, or interior trim.
The main type is the door weatherstrip, installed around the door frame or attached to the door edge. Window channel seals guide the glass and help prevent rattling. Beltline seals sit along the lower window edge, outside or inside the door. Trunk seals follow the luggage-compartment opening, while hood seals protect the engine bay from water and debris. Windshield and rear-glass seals may be molded into the vehicle design and require greater technical care.
Common installation locations include the four doors, side windows, trunk lid, hood, and sometimes removable roof panels. During replacement, compare the new profile with the original one before cutting. Clean the mounting surface completely. Remove old adhesive, dirt, and loose paint. Do not stretch the strip during fitting, because it may shrink later. Press corners gently and keep drainage paths open. Do not rush. In practical inspections, poor corner alignment is a frequent mistake. I have also found that a slightly loose strip can seal better than an over-compressed one. Recheck closure effort, wind noise, and moisture after installation. Small gaps matter.
Car seal strips are flexible profiles fitted around doors, windows, trunks, hoods, and glass edges. They compress against mating surfaces to reduce water, dust, wind noise, vibration, and heat transfer.
How to read the chart: The bars show commonly published typical continuous service-temperature ranges for major automotive sealing materials. Actual performance depends on the compound, profile design, compression, exposure, and installation location. EPDM is widely used around doors, trunks, and hoods; silicone is often selected for high-temperature or glass-related applications; PVC and TPE are commonly used for trim, window channels, and flexible edge profiles.
A car seal strip closes gaps around doors, windows, trunks, and hoods. It blocks rain, dust, wind noise, and exhaust fumes from entering the cabin. Most strips use EPDM rubber because it resists heat, ozone, and moisture. Silicone handles wider temperature ranges but usually costs more. Thermoplastic elastomers offer flexible processing and consistent surface quality. Some designs include a foam core for softer compression and better acoustic control. It is not simply rubber.
Manufacturing usually begins with extrusion, where heated material passes through a shaped die. Co-extrusion can combine a firm mounting section with a softer sealing lip. Flocking or surface coatings may reduce friction against moving glass. Metal or plastic reinforcements can improve stability around sharp curves. Small errors matter. Uneven cooling may cause shrinkage, twisting, or weak corners. Quality checks should include dimensions, hardness, compression force, adhesion, and heat-aging resistance.
Performance depends on more than material choice. Compression set is critical because a flattened strip may stop sealing after repeated use. Temperature changes also affect flexibility and contact pressure. In practical inspections, I check corner fit, surface cracks, water paths, and closing effort. A test report is not the whole story. Installation pressure, dirt, paint thickness, and door alignment can change results. Fit is everything. Some designs look durable but feel too stiff in winter, while softer profiles may wear faster under frequent movement. That trade-off deserves careful review.
A car seal strip is a flexible barrier fitted around doors, windows, the trunk, and sometimes the hood. It blocks rain, dust, wind noise, and exhaust gases. Most modern strips use EPDM rubber, which tolerates sunlight, ozone, and temperature changes better than ordinary rubber. SAE technical literature identifies heat, ultraviolet exposure, and compression set as major causes of elastomer aging.
Maintenance is simple, but often ignored. Wipe the strip with mild soap and water every few months. Remove grit from the door channel. Avoid petroleum-based cleaners, which may soften rubber or leave it brittle. A 2024 automotive rubber industry outlook from Smithers highlights sealing components as important users of weather-resistant elastomers. That matters because material quality cannot fully prevent poor maintenance.
Look for flattened sections, surface cracks, loose corners, water marks, or a new rushing sound above 50 km/h. Close a sheet of paper in the door. If it slides out easily, the seal may have lost pressure. This test is useful, not perfect. My own inspection habit is not perfect either. ASTM D395 compression-set testing explains why permanently compressed rubber may stop recovering its shape. Replacement is sensible when leaks remain after cleaning, or when the strip feels hard and brittle. Match the original profile carefully. A slightly wrong fit can create wind noise, difficult closing, or another leak.
| Seal Strip Location or Type | Main Function | Common Material | How It Works | Typical Wear Signs | Recommended Inspection | Replacement Considerations |
|---|---|---|---|---|---|---|
| Door perimeter seal | Blocks rain, dust, wind noise, and outside air around the door opening. | Usually EPDM rubber or a rubber-based flexible compound. | A hollow or molded profile compresses between the door and body to create a flexible, continuous barrier. | Water leaks, increased wind noise, flattened sections, cracks, hardening, loose sections, or visible gaps. | Inspect the complete loop with the door open. Check compression, corners, joints, and attachment points. | Replace when the seal no longer springs back, remains deformed, or allows water or excessive noise into the cabin. |
| Door glass run channel | Guides the side window and helps limit water, dust, and vibration around the moving glass. | Rubber-lined felt or flocked elastomer channel. | The channel supports the glass edges while allowing the window to move vertically with controlled friction. | Slow or uneven window movement, squeaking, glass rattle, damaged lining, or water entering the door. | Operate the window fully several times and examine the visible channel for debris, tears, and distortion. | Replacement may be needed if cleaning does not restore smooth movement or if the channel no longer holds the glass securely. |
| Trunk or tailgate seal | Prevents water, exhaust gases, dust, and road noise from entering the luggage or cargo area. | Commonly EPDM or another weather-resistant rubber compound. | The closed lid compresses the perimeter seal against the body flange to form a weather-resistant barrier. | Wet carpets, musty odors, visible splits, compressed areas, loose corners, or difficulty achieving consistent closure. | Inspect after washing or rainfall and check the carpet, spare-wheel well, corners, and seal seating. | Confirm that the lid is correctly aligned before replacing the seal; misalignment can imitate a damaged gasket. |
| Hood seal | Reduces water and debris entry into the engine compartment and can help manage airflow and noise. | Heat- and weather-resistant rubber, often EPDM or a similar elastomer. | The closed hood compresses the strip against the surrounding body or hood structure. | Cracking, hardening, missing sections, excessive engine-bay dirt, or water reaching areas normally protected by the seal. | Check for brittle areas and verify that clips, retainers, and contact surfaces are secure and clean. | Use a seal designed for the specific application because heat exposure and mounting methods vary by vehicle. |
| Windshield or window molding | Helps finish the glass-to-body area, direct water away, and protect exposed edges and joints. | Rubber, thermoplastic elastomer, or a molded trim material, depending on the vehicle design. | The molding covers or supports the perimeter of the glass and works with the glass adhesive or body flange. | Lifting edges, shrinkage, gaps, brittleness, water leaks, or visible separation near the glass. | Inspect the perimeter visually and check for leaks without prying or disturbing bonded glass. | Some moldings are installed with the glass and may require professional glass-service procedures rather than simple hand replacement. |
| Sliding or sunroof seal | Limits water, dust, wind noise, and air movement around the moving roof panel. | Weather-resistant rubber or elastomer formulated for repeated movement and outdoor exposure. | The seal contacts the roof panel or frame while allowing the panel to open, close, or slide. | Wind noise, water marks, sticking, torn corners, shrinkage, or a seal that no longer contacts evenly. | Keep drainage channels clear and inspect the seal while operating the panel slowly. | A blocked drain or misaligned panel can cause leaks even when the seal appears intact; diagnose the complete system first. |
| General maintenance | Preserves flexibility, cleanliness, and contact with the mating surface. | Compatible rubber-care products may be used when approved for the seal material. | Removing grit and maintaining flexibility helps the seal compress evenly without excessive friction. | Sticky surfaces, white residue, surface cracking, dirt buildup, or sections pulling away from their retainers. | Clean with mild soap and water, dry thoroughly, and inspect during routine washing or seasonal checks. | Avoid petroleum-based solvents, harsh chemicals, and excessive lubricant because they may swell, soften, or degrade some rubber compounds. |
| Replacement timing | Restores weather protection, cabin quietness, and correct panel contact. | The correct material and profile depend on the original application and mounting design. | A new seal must match the opening shape, attachment method, compression height, and moving-panel clearance. | Persistent leaks, drafts, abnormal noise, hardened rubber, tears, permanent flattening, or repeated detachment. | Test after installation with a controlled water check and confirm that doors, windows, hoods, or lids close without unusual force. | There is no universal replacement interval; condition, climate, ultraviolet exposure, cleaning practices, and usage determine service life. |