10 Drywall Screw Tips for Choosing the Right Type

A clean drywall finish starts with a small decision that is easy to overlook: choosing the right Drywall Screw. The screw must suit the board’s thickness, the framing material, and the job site. A fastener that is too short may not grip securely, while one that is too long can damage hidden wiring or plumbing. Small details matter. Thread style, length, head shape, coating, and point design all affect how smoothly a screw drives and how well it holds.

Coarse-thread screws generally suit wood framing, while fine-thread versions are commonly used with metal studs. That is a helpful starting point, not a substitute for checking product guidance. Match screw length to the drywall layers and framing, and use a driver setting that seats the head without tearing the paper face. On a real wall, even a few overdriven screws can mean extra filling and sanding. It is easy to focus only on speed; I would also consider how the finished surface will look under side lighting.

The right choice depends on the materials and conditions, so no single screw works for every project. These ten practical tips explain what to check before buying, how to compare common types, and where installation mistakes tend to happen. They also highlight when manufacturer instructions deserve a second look. A little uncertainty is useful here: if the framing, board, or environment differs from the usual setup, pause and verify the specifications rather than guessing.
10 Drywall Screw Tips for Choosing the Right Type

Drywall Screw Types and Their Core Differences

10 Drywall Screw Tips for Choosing the Right Type

Drywall Screw Types and Their Core Differences

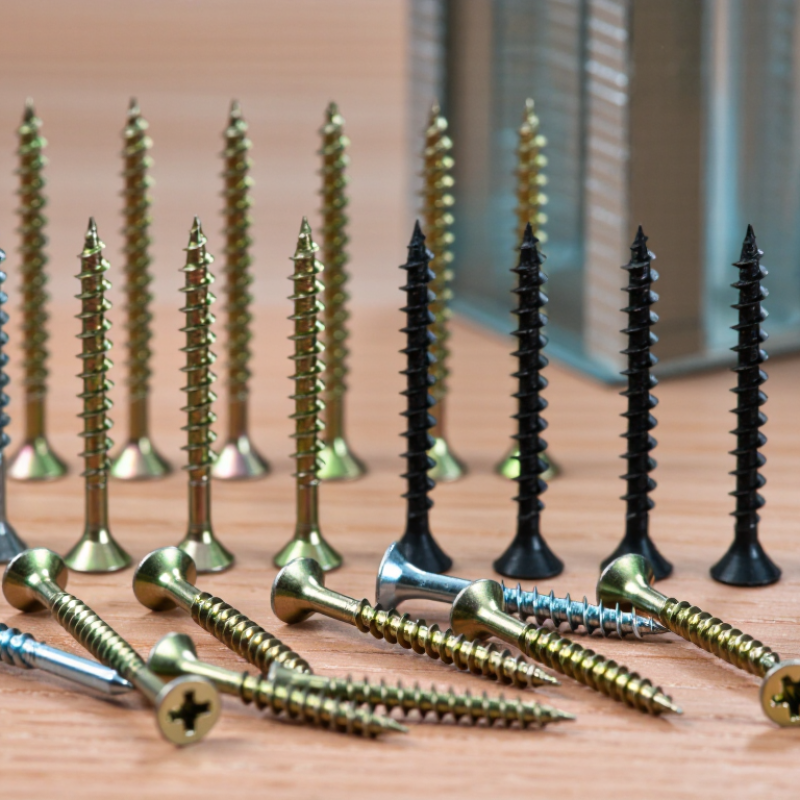
Choosing the right drywall screw begins with the framing material. Coarse-thread screws grip wood studs securely and reduce slipping during installation. Fine-thread screws suit metal studs because their sharper threads cut through thinner steel. For heavier metal framing, self-drilling screws can pierce the stud without a separate pilot hole.

The head design also matters. A bugle-shaped head spreads pressure and helps the screw sink into drywall without tearing the paper face. Standard drywall screws usually have a dark phosphate coating for indoor, dry areas. Moisture-resistant locations need screws approved for that environment, not ordinary interior fasteners. Cement board requires specialized corrosion-resistant screws, which are different from drywall screws.

Size affects holding power. A 1 1/4-inch screw often works for one drywall layer over standard framing. Thicker assemblies may require longer screws, but excessive length can damage pipes or wiring. Keep the screw slightly below the surface. Do not break the paper.

Small details matter.

From installation experience, coarse-thread screws can feel faster in wood, but they may over-grip soft framing. Fine-thread screws can strip if driven too aggressively. I still check the substrate before opening a box, because assumptions cause avoidable repairs. A clutch-controlled driver and the correct bit improve consistency, although even careful work sometimes leaves a few imperfect dimples.

Matching Screw Length and Thread Design to the Material

10 Drywall Screw Tips for Choosing the Right Type

Matching screw length and thread design to the material prevents loose panels, torn paper, and hidden damage. For standard 1/2-inch drywall on wood framing, a 1-1/4-inch screw usually provides suitable penetration. Thicker 5/8-inch board often needs a 1-5/8-inch screw. For two layers, add their thickness, then allow enough length to enter the framing securely. Avoid excessive penetration. It can strike wiring or plumbing inside the wall. The screw head should sit slightly below the paper surface, not break through it.

Thread design matters just as much. Coarse threads grip wood fibers effectively and resist spinning during installation. Fine threads work better with light-gauge metal framing because they cut through the metal cleanly. Heavier metal studs may require self-drilling screws designed for that thickness. Check the framing gauge before choosing. A screw that feels strong may still be poorly matched. In field repairs, I test one screw on a scrap piece first. This reveals whether the tip slips, the head tears the paper, or the threads fail to hold. I still occasionally choose a length by habit, which is a mistake. Humid locations also require corrosion-resistant fasteners suited to the project requirements. Be careful here. “Drywall screw” is not a universal specification.

Selecting the Right Head Shape and Drive Style

10 Drywall Screw Tips for Choosing the Right Type

Selecting the Right Head Shape and Drive Style

Tip: Choose a bugle head for standard drywall installation. Its curved underside spreads pressure around the paper face. A properly seated head leaves a shallow dimple, not a torn crater. I usually test one screw on a scrap piece first. It reveals whether the bit depth needs adjustment.

Tip: Match the head to the framing material. A sharp-pointed screw with a bugle head suits timber studs. For thin metal channels, a self-drilling screw with a flatter head may grip more reliably. Avoid forcing a large head into the board. It can crush the gypsum core and create a weak repair spot.

Tip: Check the drive style before buying a full box. Phillips drives are common, but they can slip when pressure is uneven. Square and star-shaped drives often hold the bit more securely. Keep the correct bit nearby. A worn bit causes more damage than a modestly incorrect screw choice.

Drive fit matters.

In my early projects, I focused too much on length and ignored the head shape. That caused torn paper and extra filling work. A small mistake. Now, I inspect the screw after driving it. The paper should remain intact, and the head should sit slightly below the surface without breaking through.

Choosing Corrosion Resistance for Different Environments

Drywall screw coatings should match the room, not just the board. In a dry bedroom, a standard phosphate-coated screw is usually suitable. In a bathroom, laundry room, or coastal property, frequent moisture and salty air raise corrosion risk. Look closely at corners, window reveals, and ceilings near showers; these spots can stay damp longer than the room feels damp. Salt travels.

NACE International’s 2016 IMPACT study estimated corrosion costs at $2.5 trillion worldwide, about 3.4% of global GDP. That figure covers many industries, not drywall screws, but it shows why exposure deserves attention. For humid or salt-laden areas, choose screws specifically rated for that exposure, such as suitable corrosion-resistant coated or stainless-steel types. Check compatibility with the board and framing system, too. A stronger-sounding coating is not automatically the right one.

ASTM B117 describes a controlled salt-fog test, but test results alone cannot predict years of service on a real wall. Not a guarantee. I’d treat coating claims as a starting point, then check the product’s stated use and installation guidance. A screw that looks bright at installation can still corrode behind a damp paper face. That’s easy to overlook.

10 Drywall Screw Tips for Choosing the Right Type - Choosing Corrosion Resistance for Different Environments

Tip Environment Suitable Screw Type or Finish What to Avoid Practical Selection Note
1 Dry, conditioned interior rooms Standard drywall screws with a phosphate finish are commonly used for interior drywall installation. Using standard interior screws where the wall is regularly exposed to moisture. Phosphate is primarily a coating used for interior applications; it should not be treated as a weather-resistant finish.
2 Kitchens, bathrooms, and laundry rooms with occasional humidity Use a corrosion-resistant screw specifically approved for the board, framing, and installation conditions. Assuming that every coated screw is suitable for damp locations. Ventilation, water exposure, and the wall assembly all affect the choice. Follow the drywall and fastener manufacturers’ instructions.
3 Areas with persistent condensation or frequent wetting Select a fastener with a corrosion-resistance rating appropriate to the exposure, such as a suitable stainless-steel or tested coated option. Standard phosphate-finished drywall screws. Address the moisture source as well as the fastener. A corrosion-resistant screw does not prevent damage to drywall or framing.
4 Sheltered exterior locations Use fasteners specifically rated for the exterior exposure and compatible with the cladding or board system. Ordinary interior drywall screws, even if the area is partly protected from rain. “Sheltered” areas may still experience wind-driven rain and condensation. Check the product’s stated exposure limits.
5 Direct outdoor exposure Choose a fastener approved for exterior use and the specific exterior substrate; stainless steel may be appropriate in some systems. Unrated drywall screws or relying on paint or joint compound as corrosion protection. Conventional drywall screws are generally intended for interior use. Use an exterior-rated board and fastening system where required.
6 Coastal air or salt spray Consider an appropriate stainless-steel grade, often 316 for more severe chloride exposure, when permitted by the assembly specification. Assuming a thin zinc coating or a generic “corrosion-resistant” label is sufficient for salt exposure. Actual performance depends on exposure severity, fastener design, and the surrounding materials. Follow project specifications and manufacturer guidance.
7 Wood treated with preservatives Use fasteners explicitly approved for the particular treated wood and exposure; compatible hot-dip galvanized or stainless options may be specified. Using an unapproved finish without checking compatibility with the preservative. Some wood preservatives can accelerate corrosion. Check the treatment supplier’s recommendations and applicable building requirements.
8 Pool rooms or other chlorine-rich environments Specify fasteners rated for the actual chemical and humidity exposure; an appropriate stainless grade may be required. Choosing a fastener based only on its appearance or a general indoor-use label. Chloride exposure can be aggressive. Obtain guidance for the specific pool environment and avoid substituting materials without approval.
9 Contact with dissimilar metals Choose a fastener compatible with adjacent metals and the assembly; use separation or isolation where the system requires it. Mixing metals without considering galvanic corrosion, especially where moisture is present. Compatibility depends on the metals, their contact, and the presence of an electrolyte such as water. Follow the assembly manufacturer’s details.
10 Any application with a specified fire, acoustic, or tested wall assembly Use the fastener type, coating, spacing, and installation method included in the approved assembly or product instructions. Changing to a different material or coating solely for corrosion resistance without confirming system compatibility. Fastener substitutions can affect tested performance. Confirm changes with the system manufacturer or the project’s design professional.

Checking Screw Quality, Installation Tools, and Project Requirements

A drywall screw can look suitable in a box and still perform poorly on the wall. Check that the threads are clean, the heads are not bent, and the coating has no bare patches. A handful of loose screws can reveal defects that a quick glance misses. For wood framing, coarse threads usually grip well; fine threads are intended for metal studs. Match the screw length to the board thickness and framing depth, so the point reaches the stud without protruding unnecessarily.

Use a screw gun or drill with an adjustable clutch and a drywall bit. Set the depth so each head sits just below the paper surface, forming a shallow dimple without tearing the paper. That paper matters: damage can weaken the hold and complicate finishing. Test the setting on a scrap piece first. It takes a minute. A manual screwdriver can handle a small repair, though controlling depth takes patience. I have seen rushed installations leave torn paper around nearly every head; the extra mud did not make that feel like good work.

Let the project guide the choice. Ceiling boards, thicker panels, metal framing, and damp locations may call for different screw specifications, so check the panel and framing guidance rather than guessing. Count the framing lines and plan spacing before driving screws; missed studs waste time and leave weak attachment points. Keep a few extra screws nearby. Even with careful measuring, one may land at an awkward angle.

+1 450 449 9133
Contact us sale@rhythmachine.com